Thursday, March 6, 2008

Rename Windows Xp Start button to any desired Name

I’ve read a number of articles on the internet about changing the text on the Start button in XP. On more than one occasion I’ve seen references to a five (5) letter limitation when the button is renamed. I always wondered if this was true or just an assumption someone made because the default ‘start’ just happened to fit the button size. So, I decided to run a test and see if there really was a five character limit.

First of all just u need to do is download Resource hacker.

Resource HackerTM is a freeware utility to view, modify, rename, add, delete and extract resources in 32bit Windows executables and resource files (*.res). It incorporates an internal resource script compiler and decompiler and works on Win95, Win98, WinME, WinNT, Win2000 and WinXP operating systems.

ll its just 541Kb in the size.. Click here to go to the Download Page


Download Resource Hacker

First Step The first step is to make a backup copy of the file explorer.exe located at C:\Windows\explorer. Place it in a folder somewhere on your hard drive where it will be safe. Start Resource Hacker and open explorer.exe located at C:\Windows\explorer.exe
The category we are going to be using is String Table In Resource Hacker. Expand it by clicking the plus sign then navigate down to and expand string 37 followed by highlighting 1033. If you are using the Classic Layout rather than the XP Layout, use number 38. The right hand pane will display the stringtable as shown in Fig. 02. We’re going to modify item 578, currently showing the word “start” just as it displays on the current Start button.

There is no magic here. Just double click on the word “start” so that it’s highlighted, making sure the quotation marks are not part of the highlight. They need to remain in place, surrounding the new text that you’ll type. Go ahead and type your new entry

Second Step – Modify the Registry Now that the modified explorer.exe has been created it’s necessary to modify the registry so the file will be recognized when the user logs on to the system. If you don’t know how to access the registry I’m not sure this article is for you, but just in case it’s a temporary memory lapse, go to Start (soon to be something else) Run and type regedit in the Open: field. Navigate to:
HKEY_LOCAL_MACHINE\ SOFTWARE\ Microsoft\ Windows NT\ CurrentVersion\ Winlogon

the Right pane , double click the Shell entry to open the Edit String dialog box as shown in . In Value data: line, enter the name that was used to save the modified explorer.exe file. Click OK.

Close Registry Editor and either log off the system and log back in, or reboot the entire system if that’s your preference. If all went as planned you should see your new Start button with the revised text.

Make A Autorun File For any Cd

Did You Notice, whenever You Insert any game 0r software cd, or simply consider Windows Xp Operating system cd. As soon as You Insert the disk in CD-ROM, It automatically runs the cd.

If you want to make a autorun file for that CD you are ready to burn just read this...

1) You open notepad
2) now you writ: [autorun]
OPEN=INSTALL\Setup_filename.EXE
ICON=INSTALL\Setup_filename.EXE

Now save it but not as a .txt file but as a .inf file.

But remember! The "Setup_filename.EXE" MUST be replaced with the name of the setup file. And you also need to rember that it is not all of the setup files there are called '.exe but some are called '.msi

3) Now burn your CD with the autorun .inf file included.

4) Now set the CD in you CD drive and wait for the autorun to begin or if nothing happens just double-click on the CD drive in "This Computer"

Wednesday, March 5, 2008

Change Drive Icon. Looks cool


First of all copy a icon file to the root of the drive.
example: c:\icon.ico

Then create a file called: autorun.inf in c:\autorun.inf
then open that file and type the following:

[autorun]
icon=icon.ico

save and close the file.

Now open my computer and refresh.. and woh! icon changed....
you can apply to other drives too.

be careful:
"autorun.inf" and "ico.ico" must be in the root of the drive.
example: c:\autorun.inf and c:\icon.ico.
same on the root.


Tuesday, March 4, 2008

Microsoft PowerToys to Customize Windows XP

PowerToys add fun and functionality to the Windows experience. What are they? PowerToys are additional programs that developers work on after a product has been released.

Alt-Tab Replacement
With this PowerToy, in addition to seeing the icon of the application window you are switching to, you will also see a preview of the page. This helps particularly when multiple sessions of an application are open.
Download

Virtual Desktop Manager

Manage up to four desktops from the Windows taskbar with this PowerToy.
Download

Webcam Timershot

This PowerToy lets you take pictures at specified time intervals from a Webcam connected to your computer and save them to a location that you designate.
Download

Tweak UI
This PowerToy gives you access to system settings that are not exposed in the Windows XP default user interface, including mouse settings, Explorer settings, taskbar settings, and more.
Download

For more Info, Visit http://www.microsoft.com/windowsxp/downloads/powertoys/xppowertoys.mspx

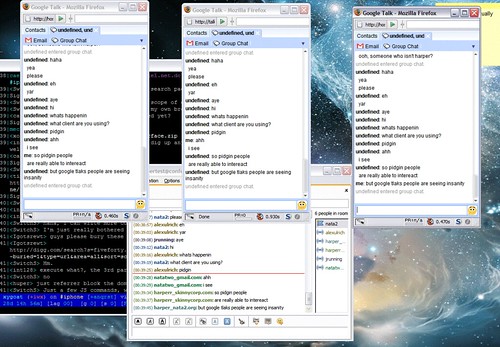
Use Multiple Google Talk


Now it's turn to use multiple google talk. Previously we covered that how to run multiple Yahoo messenger trick,

Well for google talk, you don't have to download any software. Just follow the following simple steps.

1) Create a Shortcut on ur Desktop.

2) In the field 'type the location of the item' paste the following source...

c:\program files\google\google talk\googletalk.exe" /nomutex

3)If this loction doesn't work, then locate manually by clicking on browse option. Then go to c: -> program file -> google-> google talk->googletalk.exe

and then paste /nomutex in the end of manually located source.

Finished. Now you can run multiple Google Talk.

Create a temporary Email

Many websites asks you for e-mail address to download software or to register. But you don't know what they'll be doing with your e-mail..

Your e-mail will probably be stored in a database which may be get to the hands of spammers and you will be receiving unsolicited bulk e-mail.

http://www.spambox.us/ can create a temporary e-mail address for you that will expire in the time you chose, all the mails directed to this e-mail will be transparently forwarded to your real e-mail.


For example, you need to register on a forum that requires e-mail verification, so you generate a spambox e-mail with an expiry of one hour.
The generated e-mail will expire in an hour, and this time is enough for the forum to send you verification code.

Customize google search pages with groovle

Are You bored of the regular Google Search page with the white background, then Groovle offers something that would pep up your day. Groovle enables you to select your own backgrounds for a Google Search page. You can use any of the hundreds of images in their database or upload any image of your own to use as a background for the search page.

Groovle basically uses Google Custom Search for their site and the results you get are, of course, no different but it would simply make the search page a bit visually appealing. There are different categories like Nature, Animals, Space, Celebrities etc so that you have a variety to choose from.
Visit: http://www.groovle.com/

Boost Firefox Speed


This tricks will improve the speed & load time of firefox. And you will be able to surf faster.

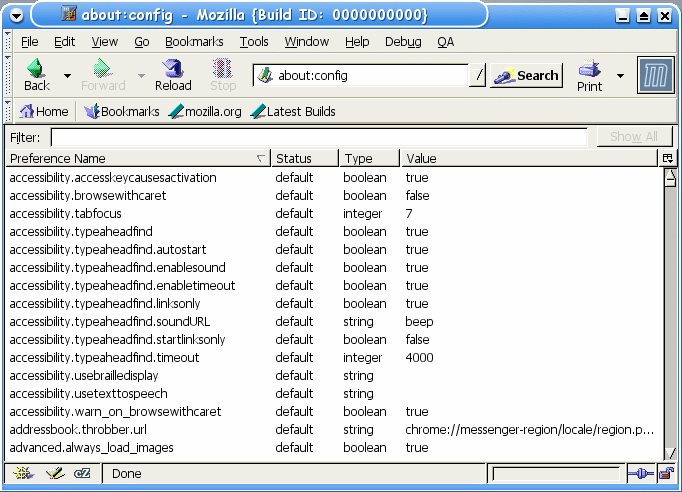
Type about:config in the address bar, Then look for the following entries, and make the corresponding changes.

1.network.http.max-connections-per-server =32
2.network.http.max-persistent-connections-per-proxy =16
3.network.http.max-connections = 64
4.network.http.max-persistent-connections-per-server = 10
5.network.http.pipelining = true
6.network.http.pipelining.maxrequests = 200
7.network.http.request.max-start-delay = 0
8.network.http.proxy.pipelining = true
9.network.http.proxy.version = 1.0
Lastly right-click anywhere and select New- Integer. Name it nglayout.initialpaint.delay and set its value to 0. This value is the amount of time the browser waits before it acts on information it recieves.Enjoy!!

SpeedUp PhotoShop Startup.

Photoshop required large memory to function well (1 GB or more is preferable) because it handle image files. Here discussing how to speed up startup of Photoshop.

Each time Photoshop start, all plug-ins (necessary or unnecessary) also load with Photoshop. You can prevent unnecessary plug-ins by loading thus reduce start up time.

Navigate to C:\program files (assuming ‘C’ is your installed directory)\Adobe. Open the directory. Here you can see folder named ‘plug-ins’. Within this folder you find the plug in files, all of which loaded each time Photoshop started.

You can disable plug-ins which you scarcely use. To do this simply edits the name of the files or folders containing plug-ins and insert a tilde (~) before each name. You can always re-enable the plug-ins by deleting the symbol ‘~’.